Sheep Shearing Tally Excel – Free Template (2026)
9
Free download
Track camping gear, quantities, owners, costs and packing progress across Australian trips with three linked Excel sheets.
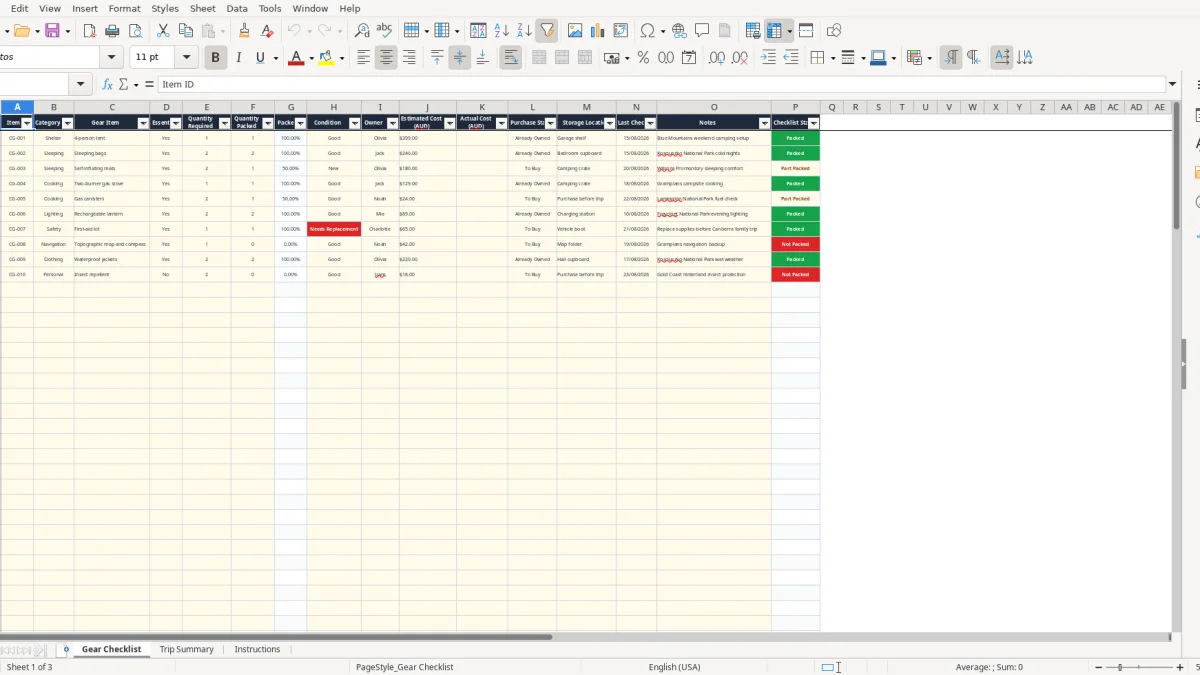
This camping gear checklist Excel template helps you organise equipment, track required and packed quantities, record owners and storage locations, and monitor estimated versus actual costs. It includes a detailed Gear Checklist, an automatically calculated Trip Summary and an Instructions sheet for Australian camping trips.
Use the Gear Checklist for up to 100 gear rows, from tents and sleeping bags to cooking, safety and navigation equipment. The workbook calculates packed percentage and checklist status from your quantities, while the summary shows what is ready, what still needs attention and what you may need to buy.
It is suitable for a family weekend in the Blue Mountains, a cold-weather trip to Kosciuszko National Park or a longer journey through several Australian states. Costs are recorded in AUD and dates use DD/MM/YYYY.
A camping gear checklist is useful whenever several people are sharing equipment or a trip has enough moving parts to make memory unreliable. A family preparing for a long weekend in Victoria can allocate the tent to one adult, sleeping bags to another and cooking equipment to the person packing the vehicle. A hiking group heading into Tasmania can use the same list to confirm that safety and navigation items are not overlooked.
The workbook's Gear Checklist sheet (image 1) has 16 visible columns, including Category, Gear Item, Essential?, Quantity Required, Quantity Packed, Condition, Owner and Storage Location. That structure suits a household with two adults and two children, or a club that lends equipment between members. Entering two sleeping bags required and one packed immediately produces a Part Packed result.
The owner list contains Jack, Olivia, Liam, Charlotte, Noah and Mia. Those names are populated examples of the available choices, not restrictions on who may use the list; you can use the workbook's existing selections to allocate the sample trip gear.
Do the first pass 7 to 14 days before departure, when there is still time to replace a damaged stove or buy a missing sleeping mat. Do a second pass the day before loading the car. If a four-person camping setup needs 1 tent, 4 sleeping bags and 4 mats, the quantities make the shortfall visible instead of leaving someone to count equipment at the boot.
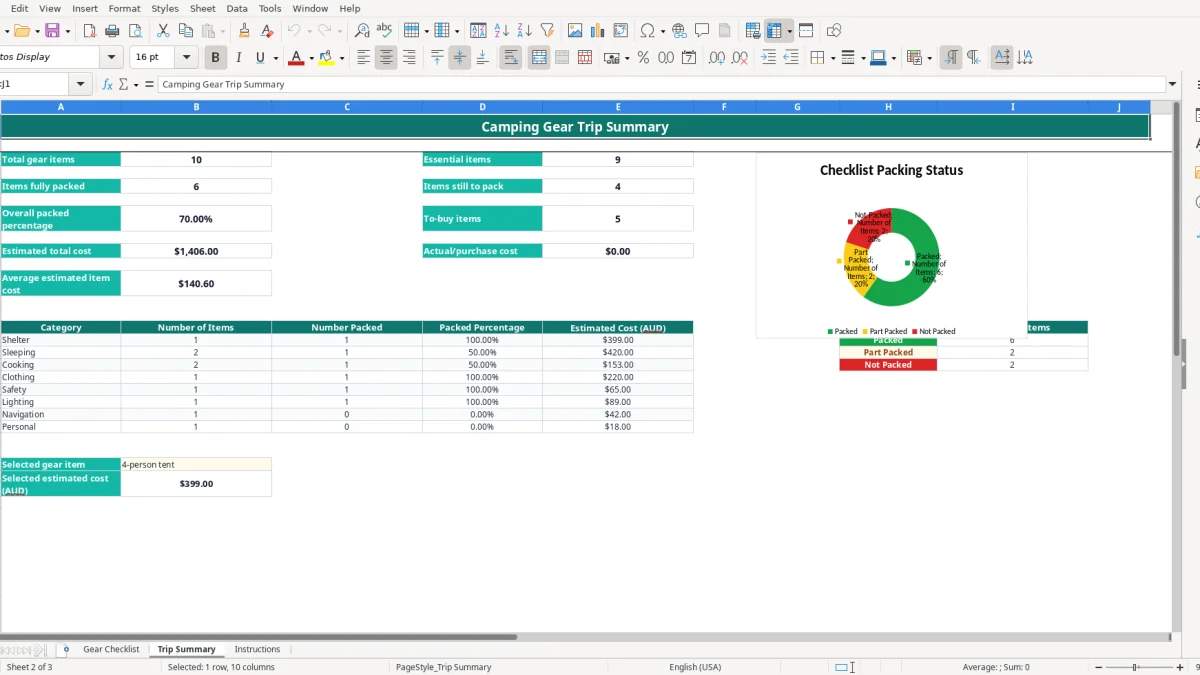
The Trip Summary sheet (image 2) turns the row-level entries into a quick readiness check. It counts total and essential items, calculates average packing progress, separates estimated from actual cost and groups equipment across eight categories. The Instructions sheet (image 3) adds destination and safety reminders relevant to Australian trips.
For a driving-based camping trip, use a road trip fuel cost tracker alongside the gear list to estimate fuel, tolls and parking for each travel leg.
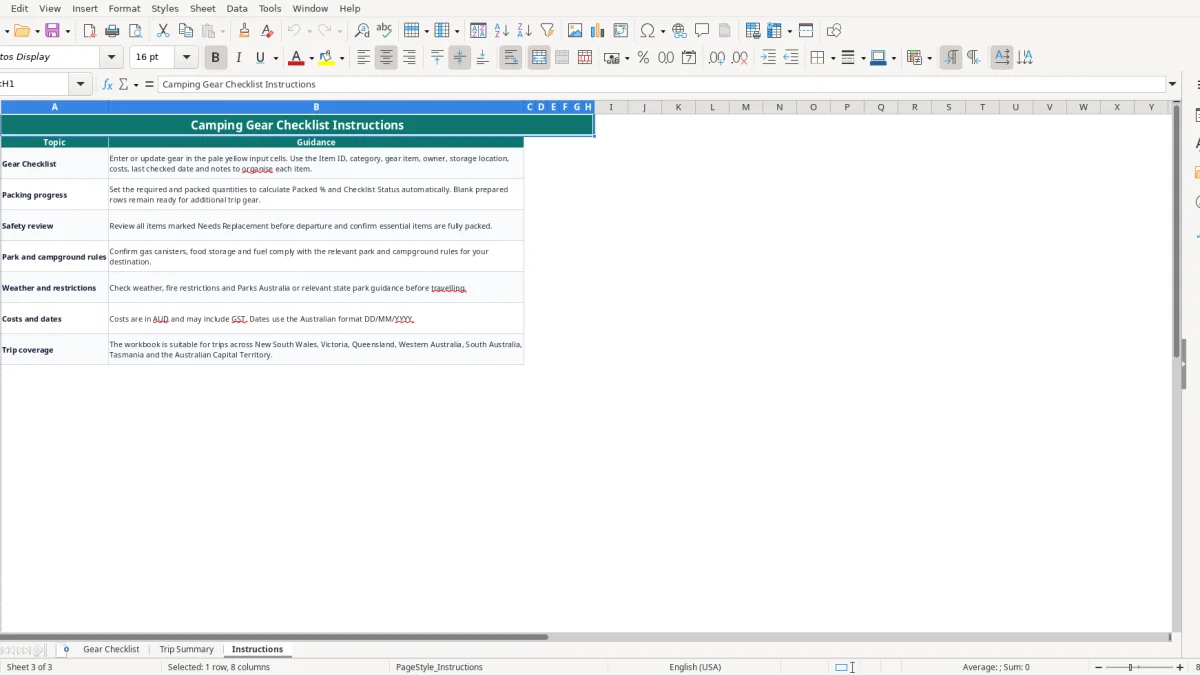
This workbook is an organisation tool, not a substitute for the rules applying at your destination. Before leaving, check the relevant state park authority, Parks Australia or campground operator for current requirements. The Instructions sheet specifically tells you to confirm gas canister, food storage and fuel rules, and to check weather and fire restrictions.
A camping trip in New South Wales, Victoria, Queensland, Western Australia, South Australia, Tasmania or the Australian Capital Territory may have different restrictions. A fuel stove permitted at one campground may be restricted during a total fire ban, while a remote area may require approved food storage or prohibit collecting firewood. Record the result in Notes, but treat the official destination notice as the controlling source.
For example, if a planned three-night trip falls during a period of high fire danger, mark the cooking item for review and confirm whether gas, solid-fuel or open-flame equipment is allowed. That is a practical reason to use the Condition and Purchase Status fields rather than simply ticking an item off.
Enter Last Checked dates in DD/MM/YYYY format. A tent last checked on 15/08/2026 may be fine for a dry weekend, but it should still be inspected for poles, seams and waterproofing before a forecast of 30 mm of rain. Use Notes for details such as a missing peg, a battery expiry date or a campground booking reference.
Costs are in AUD and may include GST, as stated in the workbook instructions. If a stove is estimated at $89.95 and is purchased for $104.95, enter those amounts in the separate estimated and actual cost fields. The Trip Summary then shows the difference through its two cost totals, helping you spot a trip budget that has moved before departure.
The expensive mistakes usually happen in the gap between owning an item and having a usable item packed. A tent can be listed as owned but still have a broken pole; a stove can be present but have no compatible fuel; four people can arrive with only three sleeping mats. The workbook separates Condition, Purchase Status and Checklist Status so those problems are visible in different fields.
Counting rows instead of quantities is a common failure. One row called Sleeping bags does not prove that four bags are ready. If Quantity Required is 4 and Quantity Packed is 3, Packed % is 75% and the status is Part Packed. That missing item might mean a $120 replacement purchase or an uncomfortable night, depending on the trip.
A zero quantity is also worth checking. The formula returns 0 when Quantity Required is zero, so a gear item will not misleadingly show 100% packed. Use the required quantity as the number people, meals or units genuinely need, rather than entering one simply to make the percentage look complete.
Marking a damaged item Good can lead to a rushed replacement. For a family with $399 invested in a four-person tent, discovering a failed zip at the campsite can cost a replacement, a motel night or hours of driving. Select Needs Replacement early and use Notes to explain what failed.
Double-buying is another avoidable cost. If a camping crate already contains a lantern but the list says To Buy, the estimated total may overstate the planned spend. Compare Storage Location, Purchase Status and Actual Cost before shopping, then update the row after purchase. The summary's estimated total, actual or purchase cost and to-buy count give you three useful checks, but they only work when the inputs are current.
A spreadsheet works best when checking it is attached to something you already do. Set aside 20 minutes on the weekend before departure, then repeat the check while loading the vehicle. For a trip leaving on Saturday morning, review the list on Thursday night, buy outstanding items on Friday and update Quantity Packed as equipment goes into the car.
Keep the calculated columns intact. Enter data in the input fields, use the drop-down choices and let the formulas return Packed %, Checklist Status and Trip Summary results. If an item needs more explanation, put it in Notes rather than changing the standard status wording, because the summary counts those exact values.
For one household and 100 or fewer listed gear rows, this workbook is a practical fit. If you manage several club trailers, hundreds of borrowed items or frequent check-outs, move to a shared inventory system with user permissions and a proper change history. The Excel file remains useful as a trip-level packing sheet, but it should not be the only control for a large equipment pool.
After each trip, update the condition and last checked date while the gear is still unpacked. That five-minute reset means the next checklist starts with reliable information rather than a forgotten list from the previous season.